This lab came as an introduction to using Arduino microcontrollers, and was split up over three weeks of class.
Week One: Digital I/O With LEDs

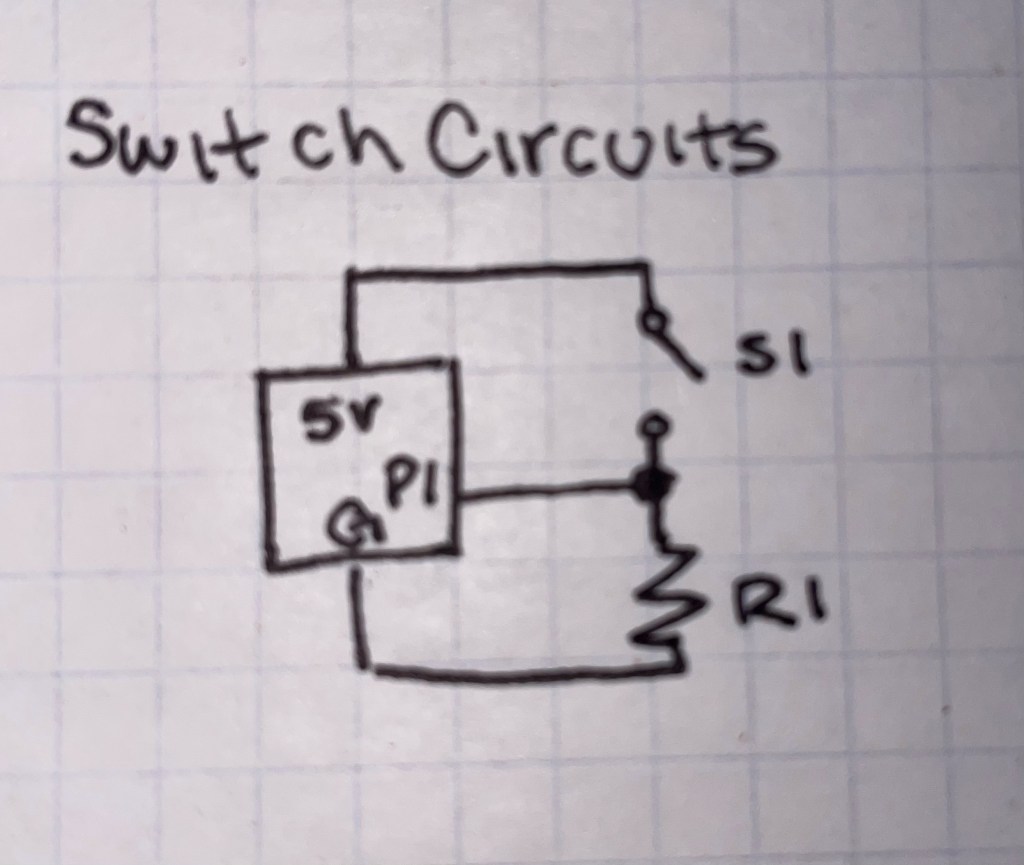
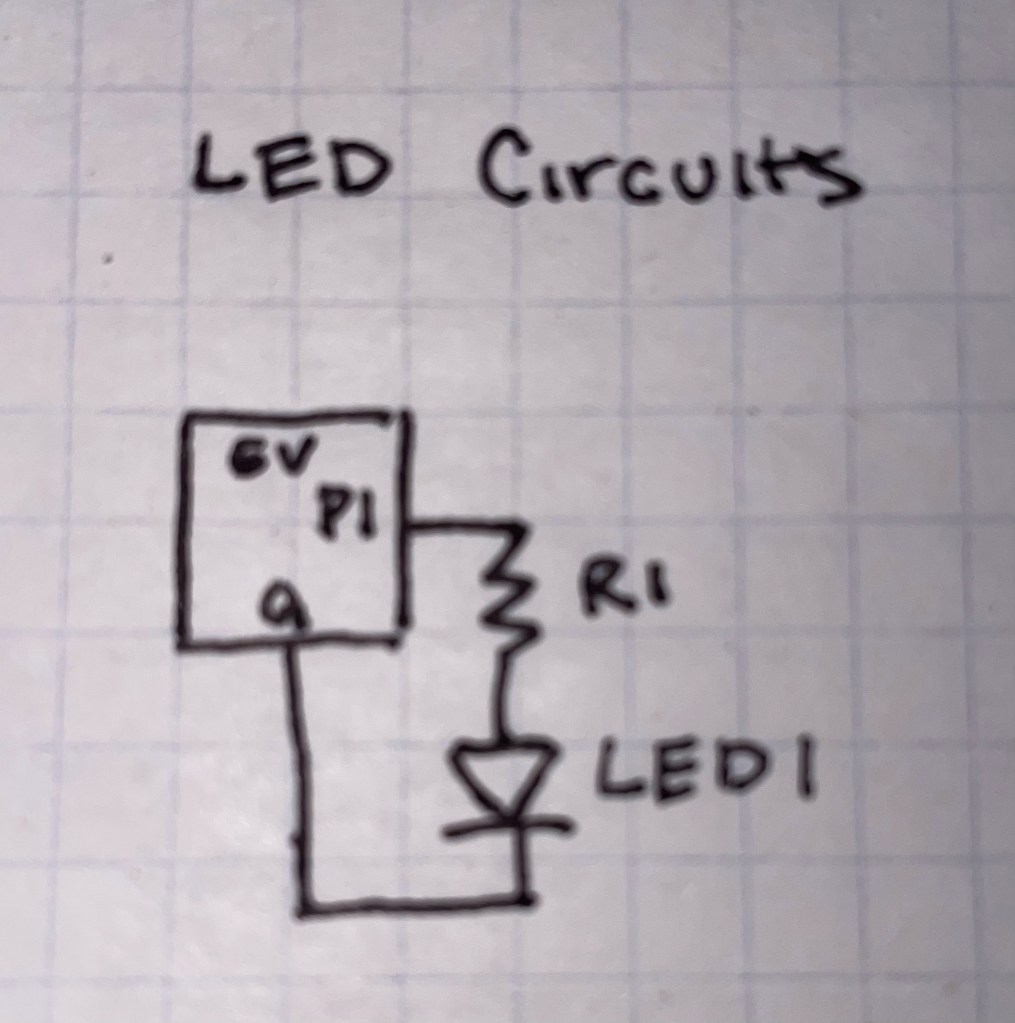
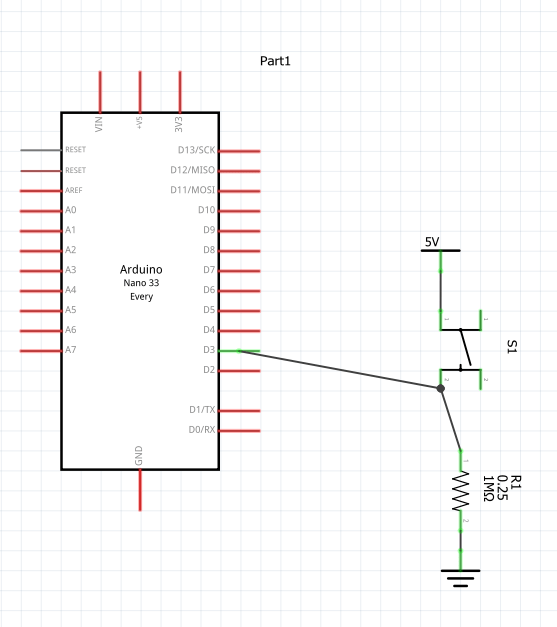
The aim of the lab’s first week was to build a circuit with two switches and two LEDs, and program the microcontroller such that different combinations of switch activation would create unique outputs.
I found the content of this week rather challenging, as there were four complete circuits that needed to be made in order to create the full system with two switches controlling separate LEDs. Much like the last lab, drawing out circuit diagrams came to my rescue and helped me find where I continually went wrong.
// constants won't change. They're used here to set pin numbers:
const int buttonPin1 = 2;     // the number of the pushbutton pin
const int buttonPin2 = 3;
const int ledPin1 =  20;      // the number of the LED pin
const int ledPin2 = 21;

// variables will change:
int buttonState = 0;         // variable for reading the pushbutton status

void setup() {
  // initialize the LED pin as an output:
  pinMode(ledPin1, OUTPUT);
  pinMode(ledPin2, OUTPUT);
  // initialize the pushbutton pin as an input:
  pinMode(buttonPin1, INPUT);
  pinMode(buttonPin2, INPUT);
}

void loop() {
  // read the state of the pushbutton value:
  buttonState = digitalRead(buttonPin1);

  // check if the pushbutton is pressed. If it is, the buttonState is HIGH:
  if (buttonState == HIGH) {
    // turn LED on:
    digitalWrite(ledPin1, HIGH);
  } else {
    // turn LED off:
    digitalWrite(ledPin1, LOW);
  }

    // read the state of the pushbutton value:
  buttonState = digitalRead(buttonPin2);

  // check if the pushbutton is pressed. If it is, the buttonState is HIGH:
  if (buttonState == HIGH) {
    // turn LED on:
    digitalWrite(ledPin2, HIGH);
  } else {
    // turn LED off:
    digitalWrite(ledPin2, LOW);
  }
}
This portion of the lab went much quicker once the circuits themselves were built, as I based my code off of the “button” example code of the Arduino library. The biggest challenge after the circuits was figuring out the pinout diagram, as the pins on the Arduino itself are not labelled.
Week Two: Digital I/O With a Programmable LED Strip
The second week was an introduction to both soldering and slightly more complex programming with the Arduino, as programmable LED strips were introduced.
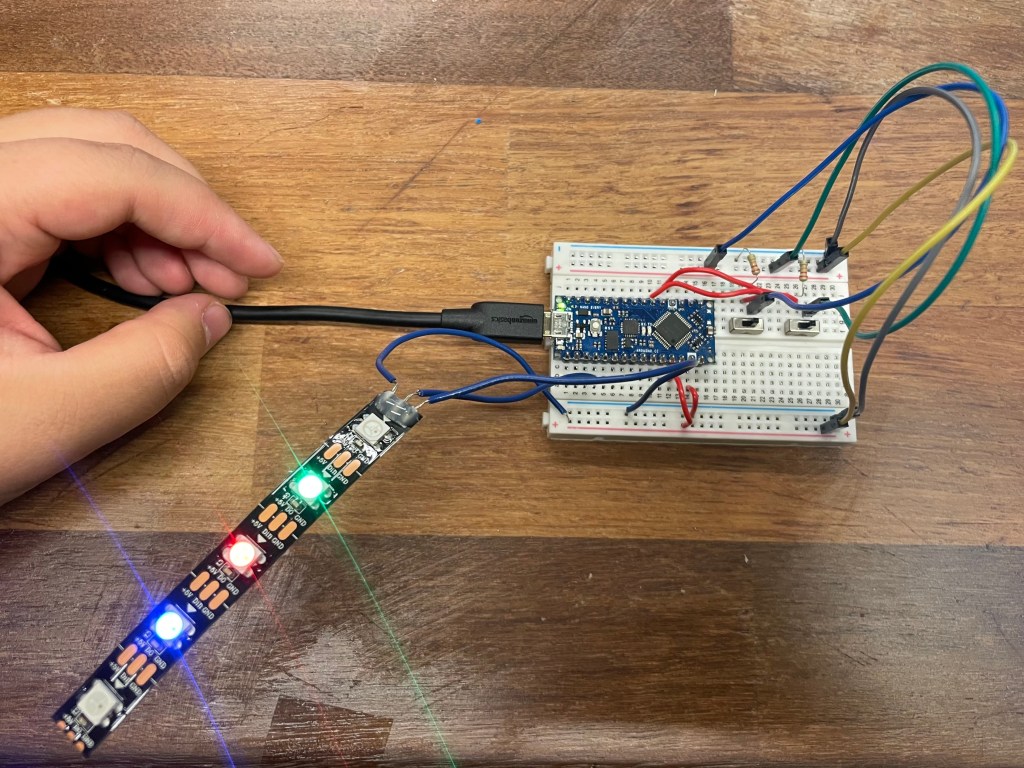
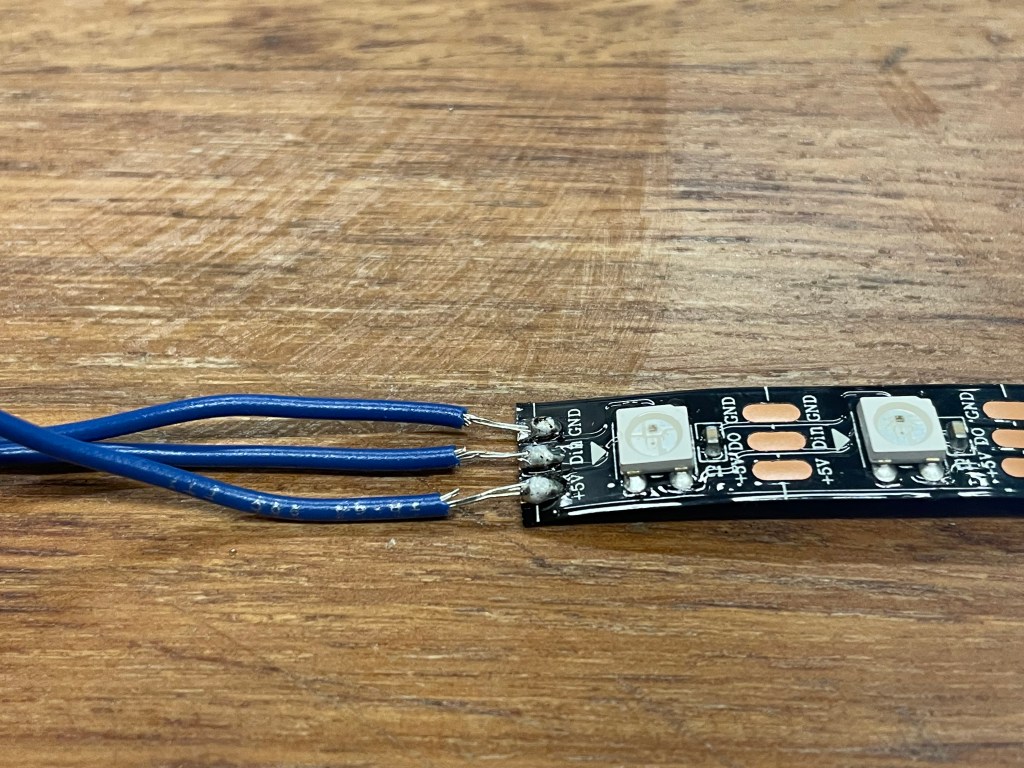
This week was my first time soldering, and while it took a few tries to get the hang of it (and get my hands to stop shaking), I am proud of myself for being able to solder wires onto the LED strip in such a way that the electrical connection works.
The circuits used were a simplified version of last week’s circuits, as the LED strips have built in resistors. Instead of one circuit for each LED, the LED strip could simply be plugged directly into the breadboard. In addition, the two circuits used for the switches did not need to be changed whatsoever.
The code for this week was more challenging as well, and while I have never written code in C, it was similar enough to C++ that I was able to catch on quickly. I also took code from the example Adafruit Neopixel library in the instance where the switches are both on in order to create the effect of cycling through the rainbow.
#include <Adafruit_NeoPixel.h>
#ifdef __AVR__
  #include <avr/power.h>
#endif

#define PIN 14

const int switch1 = 2;
const int switch2 = 3;

int switchState1=0;
int switchState2=0;

Adafruit_NeoPixel strip = Adafruit_NeoPixel(5, PIN, NEO_GRB + NEO_KHZ800);

void setup() {
  // put your setup code here, to run once:
  strip.begin();
  strip.show();//initialize all pixels to off

  //initialize button pins
  pinMode(switch1,INPUT);
  pinMode(switch2,INPUT);

}

void loop() {
  switchState1 = digitalRead(switch1);
  switchState2 = digitalRead(switch2);

  // put your main code here, to run repeatedly:
  //switch 1 is on
  if (switchState1 == HIGH && switchState2 == LOW)
  {
    for(uint16_t i=0; i<strip.numPixels(); i++)
    {
      strip.setPixelColor(i,153,255,204);
      if (i > 0)
      {
        strip.setPixelColor(i-1,153,255,255);
        strip.show();
        delay(500);
      }
      if(i>1)
      {
        strip.setPixelColor(i-2,153,153,255);
        strip.show();
        delay(500);
      }
      delay(500);
    }
  }

  //both switches are on
  else if (switchState1 == HIGH && switchState2 == HIGH)
  {
    rainbowFade2White(3,3,1);
  }

  //switch 2 is on
  else if (switchState1 == LOW&& switchState2 == HIGH)
  {
    for(int i=0; i < strip.numPixels();i++)
    {
      if(i%2==0)
      {
        strip.setPixelColor(i,0,255,128);
        strip.show();
      }
      else
      {
        strip.setPixelColor(i,255,153,153);
        strip.show();
      }
    }
    delay(250);
    for(int i=0; i<strip.numPixels(); i++)
    {
      if(i%2==0)
      {
        strip.setPixelColor(i,255,153,153);
        strip.show();
      }
      else
      {
        strip.setPixelColor(i,0,255,128);
        strip.show();
      }
    }
    delay(250);
  }

  //both switches are off
  else
  {
    for(int i=0; i < strip.numPixels(); i++)
    {
      strip.setPixelColor(i,0,0,0);
      strip.show();
    }
    for (int i = 0; i < strip.numPixels(); i++)
    {
      strip.setPixelColor(i,255,255,255);
      strip.show();
      if (i > 0)
      {
        strip.setPixelColor(i-1,0,0,0);
        strip.show();
      }
      delay(250);
    }
    for (int i = strip.numPixels(); i>=0;i--)
    {
      strip.setPixelColor(i,255,255,255);
      if (i < strip.numPixels())
      {
        strip.setPixelColor(i+1,0,0,0);
        strip.show();
      }
      delay(250);
    }
  }


}

void rainbowFade2White(int wait, int rainbowLoops, int whiteLoops) {
  int fadeVal=0, fadeMax=100;

  // Hue of first pixel runs 'rainbowLoops' complete loops through the color
  // wheel. Color wheel has a range of 65536 but it's OK if we roll over, so
  // just count from 0 to rainbowLoops*65536, using steps of 256 so we
  // advance around the wheel at a decent clip.
  for(uint32_t firstPixelHue = 0; firstPixelHue < rainbowLoops*65536;
    firstPixelHue += 256) {

    for(int i=0; i<strip.numPixels(); i++) { // For each pixel in strip...

      // Offset pixel hue by an amount to make one full revolution of the
      // color wheel (range of 65536) along the length of the strip
      // (strip.numPixels() steps):
      uint32_t pixelHue = firstPixelHue + (i * 65536L / strip.numPixels());

      // strip.ColorHSV() can take 1 or 3 arguments: a hue (0 to 65535) or
      // optionally add saturation and value (brightness) (each 0 to 255).
      // Here we're using just the three-argument variant, though the
      // second value (saturation) is a constant 255.
      strip.setPixelColor(i, strip.gamma32(strip.ColorHSV(pixelHue, 255,
        255 * fadeVal / fadeMax)));
    }

    strip.show();
    delay(wait);

    if(firstPixelHue < 65536) {                              // First loop,
      if(fadeVal < fadeMax) fadeVal++;                       // fade in
    } else if(firstPixelHue >= ((rainbowLoops-1) * 65536)) { // Last loop,
      if(fadeVal > 0) fadeVal--;                             // fade out
    } else {
      fadeVal = fadeMax; // Interim loop, make sure fade is at max
    }
  }

  for(int k=0; k<whiteLoops; k++) {
    for(int j=0; j<256; j++) { // Ramp up 0 to 255
      // Fill entire strip with white at gamma-corrected brightness level 'j':
      strip.fill(strip.Color(0, 0, 0, strip.gamma8(j)));
      strip.show();
    }
    delay(1000); // Pause 1 second
    for(int j=255; j>=0; j--) { // Ramp down 255 to 0
      strip.fill(strip.Color(0, 0, 0, strip.gamma8(j)));
      strip.show();
    }
  }

  delay(500); // Pause 1/2 second
}Week Three: Soldered Breakout Boards
The third and final week of the lab had me testing my skills with soldering, as we made breakout boards. I chose to make a breakout board with a button, and I used the same code shown in part two.
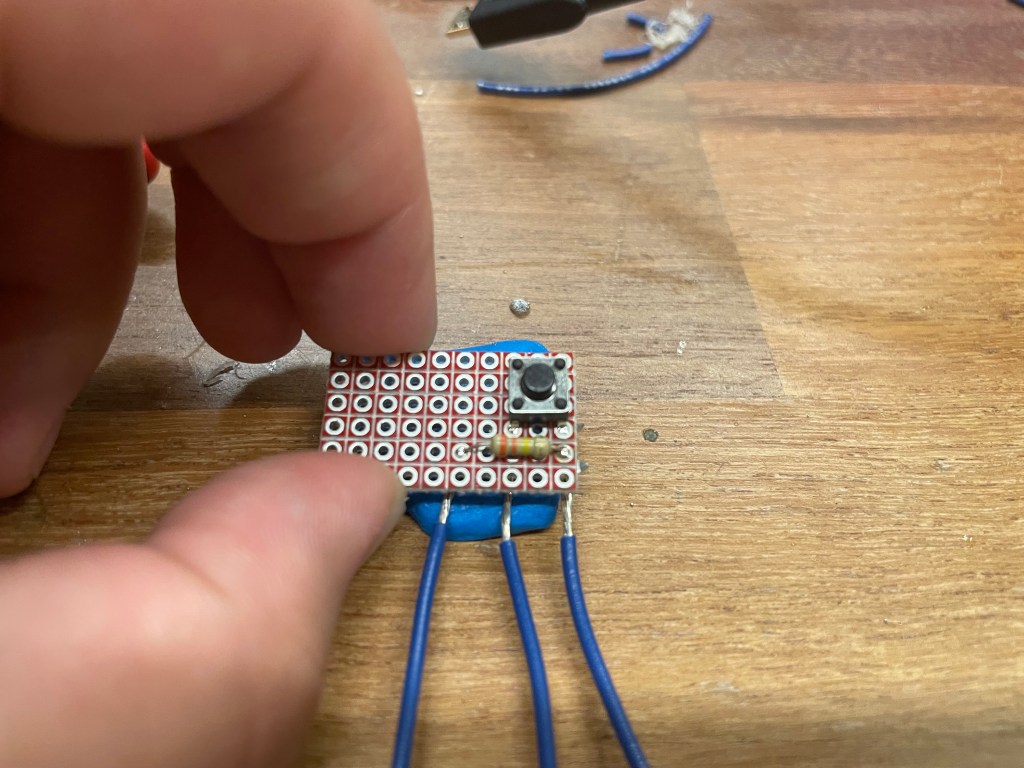
When the button was pressed, the Arduino would sense that both button states are high, and therefore the rainbow code would run. When not on, the code for the other switch being on would run.
